Showing posts with label chocolate. Show all posts

Monday, March 21, 2011

Guinness Chocolate Cupcakes

Nick recently made a sarcastic comment that he "used to know someone who made cupcakes" when he spotted me looking at cupcake wrappers at a store recently. I got a little miffed at first, but then realized I had been lacking on the cupcake making of late.

I quickly remedied that when, after looking through my recipes, I noticed one labeled "Beer Cupcakes". They sounded good, but when I noticed chocolate was involved, I almost changed my mind. I decided, though, that the beer and the cream cheese frosting might make them good enough for even me to like. I was right.
I used an entire bottle of Guinness for one batch of cupcakes, lots of flour, brown sugar, sour cream, vanilla, baking soda, butter and cocoa powder.

First, the Guinness and butter are combined and heated in a saucepan.

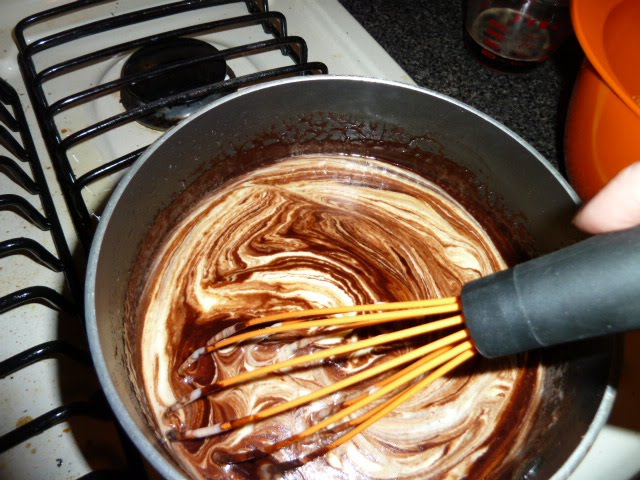
Next, the brown sugar and the cocoa get whisked in, and this is where I fell in love. The smell that was coming from the pan was so intoxicating, I wanted to eat it with a spoon right then and there.


But, I didn't. Instead, I continued with the recipe and mixed the sour cream with the eggs and vanilla and added it to the beer mixture. Looks pretty good, doesn't it? Glad I finally got a coated whisk!
The flour and baking soda are then sifted together and folded into the beer mixture (batter). Folding is always hard for me, because I never seem to get the two mixtures to incorporate in an amount of time that seems appropriate for not over folding.

Then, bake. As you can see, I had too many cupcakes for one pan, and not enough for two. I have been told that you should space them out in this situation, so they cook more evenly, so that's what I did.
I am really liking cream cheese frosting lately. It is not as overpowering or as greasy seeming as buttercream, and cream cheese frosting seems to compliment, or bring out the flavors, of the cake more. Cream cheese, sugar and milk made a great frosting to top these cupcakes.

These cupcakes had a good beer flavor, they were not too sweet, they were moist, and they went very quickly at our house. I will definitely make these again. And, I guess I have to stop saying how much I don't like chocolate since I've found so many tasty recipes to bake that use chocolate. That's a crazy thought!

Monday, August 16, 2010

Chocolate Salted Caramel Cupcakes

A couple weekends ago Nick and I went to visit our friends Dana (a loyal reader and commenter on here) and her husband Jake (who I hope will become a loyal reader after this post ;) ) Dana and Jake used to live in Milwaukee, only a short distance from our house. However, now they live in Gurnee, IL - not such a short distance. So, we decided a longer, weekend, visit was in order. What better way to spend part of a weekend than baking?

Dana, who doesn't bake too much, was not only up for the challenge of donning her apron and getting dirty, but for writing the blog about it (yay!). So, I will now turn the floor over to her (love her cute apron!)...


*****
I recently had the pleasure of spending the weekend with a good friend and baking coach! What more could a girl asked for? Too bad Sheri had no idea what she had gotten herself into.

Although I like to bake; my baking skills are lacking. If my baking turns out, it is because I followed a good recipe to the T. So, my goal in having a baking coach around was: learn something new, and something that might help improve my baking from a box skills! (I know baking for a box is not really baking, but sometimes it is necessary.)

I suggested we swap some recipes before the weekend. Before blinking, Sheri flooded my inbox with loads of recipes she had been thinking about. After reviewing the e-mails, I identified what I thought was an ambitious recipe. I could feel the excitement penetrating through my fingers as I responded to the slough of e-mails and thought, “THIS IS THE ONE!” I chose Chocolate Salted Caramel Cupcakes. I knew as soon as I saw it that it was the one I wanted to make; everyone loves caramel (even my husband who dislikes sweets) and yummy, chocolate, and they seemed just right for an indulgent weekend with friends. Let the baking begin…

The recipe can be found here, for those of you who like to follow along: http://ibakecupcakes-sarahlyn.blogspot.com/2010/07/chocolate-salted-caramel-cupcakes-save.html)

Step 1 – Put on your adorable apron. Sheri had asked me if there was anything she needed to bring for the weekend. The only suggestion I had was an “adorable apron”, for which she complied.

Step 2 – Get out ALL ingredients. I like to do this so I am not opening cabinets with sticky fingers, which would add one more thing to the cleanup list.

Step 3 – Start baking!

Sheri and I worked really well as a team – adding the dry ingredients to the KitchenAid® mixing bowl before whisking them up. (I learned that standing mixers are not preferred for those who like to “feel” the mixing (i.e., Sheri). For you “feelers” out there, use a hand mixer.)

In my excitement, I immediately added the wet ingredients to the dry ones. Opps number one! The recipe calls for mixing the wet ingredients together in one bowl, the dry in another, then adding the wet to the dry. Well, since the ingredients all went into the same bowl at once, this recipe was an experiment – Do you have to premix the wet ingredients before adding to the dry?


About half way through the mixing of the ingredients, I walked away from the mixer. Opps number two! I quickly learned from Sheri that this is a very bad no-no. Walking away from a standing mixer, that is mixing, can cause over mixing. Over mixing can make the batter more dense and doughy. Who knew? (Apparently Sheri.) This is also why a hand mixer may be better. You will never accidently walk away from a hand mixer while it is running. (If this does happen to you, I suggest you turn off the hand mixer, put away the wine, sober up, and then return to baking.)


After completely mixing the ingredients, the batter seemed runny. I was worried, but Sheri was not. I thought it was a bit too thin, and had Sheri not been there, I would have added more flour. Turned out Sheri was right to leave them be, as the cupcakes baked nicely, though they didn’t rise much. That might have had something to do with oops number two, but we cannot be sure. There must be some reason the wet is mixed before adding to the dry; however, that reason was not discovered with these little cakes.


After the cupcakes cooled, I cut out the centers. Sheri suggested making cones by sticking a knife in at one point and rotating it in a circular motion (and if you have to hand frost the cupcake, cut off the bottom of the cone off, fill the cupcake and replace the top to plug the hole on the cupcake).


Next came the caramel filling and salt sprinkle. Spooning in the caramel filling was easy with it warmed up a bit (we did not make the caramel sauce ourselves, but used store bought). The recipe called for sea salt, but I only had Kosher, and it worked just fine.

Then, Sheri made the butter cream frosting. She did a great job! My ability to get distracted while cooking took hold here and Sheri had the whip up the frosting on her own (Sorry Sheri. This was a baking lesson and since we were not baking the frosting...). All I know is that there was a lot of powdered sugar, butter, milk and cocoa powder. All good things! If we are lucky, Sheri will share her butter cream frosting recipe with us! The consistency of the frosting was marvelous. Sheri used the hand mixer (of course) for this part.

Since I failed to tell Sheri to bring her pastry bags and tips, she suggested using a zip lock bag and cutting off one corner. Again, her idea worked perfectly, making frosting a piece of cake!

TASTE TEST TIME! This is by far my favorite part of baking! Sheri and I both agreed that the little caramel filled chocolate cakes with chocolate butter cream frosting were divine. Sheri did not think the salt would do much, and thought it might be gross, but we were both wrong. Do not leave off the salt! It really adds to the flavor of the caramel and chocolate.

In summary, I learned the following lessons:
1) Mix wet ingredients before mixing with dry, unless you have an expert baker with you.
2) Most importantly DO NOT OVER MIX after you add in the wet ingredients!
3) When making cupcakes filled with something, save the tops of the removed cone to re-plug the filling hole.

Thanks Sheri – I had a great time baking with you!

(KitchenAid is a registered trademark owned by KitchenAid.)

*****

Wednesday, February 24, 2010

Strawberry Lemon Vodka Cupcakes

I think I had my first fail.

A couple weeks before this Valentine's Day, a holiday we don't normally do anything for but have dinner just us, my husband and I both mentioned we wanted to do something more. I enlisted a friend to help make decorations, I borrowed a friend's Le Creuset so I could make Julia Child's boeuf bourguignon, and I set out to find the perfect dessert. I thought I had found it when I saw Strawberry Vodka Lemon Cupcakes on the Baking Bites Blog.

The morning of the holiday, 2 hours before we were to be at a reservations only brunch, I started the cupcakes. I made the recipe just as directed and, while mixing in the flour and milk, I noticed it was becoming almost taffy-like. After the third alternating mixture, the batter started wrapping itself around the mixers and got worse the more I tried to mix. With that consistency, I did not believe it would make anything worth eating. I called in my husband in for a "baking consult". He suggested that I either mixed too much or packed the flour too tightly so the mix was too dry.


Since I really wanted to have cupcakes for my guests (and lets face it, for me), I decided to give it a second go. I made sure to not pack the flour tightly and mixed each alteration much less than I did previously. The same thing happened, but not quite to the extent of the first batch. I was still worried it would not make anything worth eating, but as I had 45 minutes to shower, dress and get to brunch, I decided to bake them and see what happened. They came out looking like a dense, doughy muffin or biscuit. They tasted good, but were not light and fluffy or cake-like; they were kind of like the consistency of a buttermilk biscuit.

I was at a loss. I wanted a light, fluffy, cake-like cupcake that I could put a pink whipped cream frosting and chocolate hearts on. I wanted something that felt more like Valentine's Day, and these sort-of-muffin things were not it. When we got back from brunch, I scoured the net for an easy recipe, since I had to make it between dinner preparations. It also had to fit the ingredients I had on hand. I still had some strawberries and just enough flour and sugar for another try. I used up all the zest, lemon juice and vodka in the first two batches so I had to make do without those. But, there was still hope.

I found an Easy Strawberry Cupcake recipe that claimed to be "delicious and loved by everyone". They proved to be all that. The batter for those went just like I expected, though I made a few changes: I mashed the strawberries in a bowl with a potato masher and substituted some of the vanilla extract with lemon extract. I made a whipped cream frosting with red food coloring to turn it pink and just a touch of lemon juice for flavor. My husband melted down the rest of the dark baking chocolate we had and made chocolate hearts to top them with. They were beautiful, delicious, and a great end to my cupcakes trials of the day.


Unfortunately, with all the problems and other cooking going on, I neglected to take pictures of the whole process, except the taffy-like dough (above). However, we did get some good ones of the finished product, and even a rare picture of me posing with my baking.

I was glad to have some cupcakes to serve our guests, but I really wanted to know why the first recipe didn't work. Did I somehow mess up the recipe twice, was there a typo in the recipe, or was that just how they were supposed to turn out? I went to the blog and read some of the comments. I found that others thought the recipe turned out more like muffins as well. So, maybe it wasn't my fault they turned out that way after all.

Though early on I felt like I was having my first failure, in the end, I don't think I can call it a total failure. I had to make three different batches of cupcake mix to get one to turn out like cupcakes, but the second batch I mixed made for nice muffins and the third was great for dessert. I ran out of vodka and lemon zest. However, I didn't need the vodka to make a good dessert, and I had lemon extract to substitute for the zest. Finally, I feel like I learned a little about what consistency and ingredients, including how much of each, makes different kinds of baked goods. This whole baking adventure as I like to call it started as a way to get me off the couch, but has turned into so much more, and learning is part of that.


Happy Valentine's!

Saturday, January 30, 2010

Scratch Brownies

Baking on a day when you have nothing else to do is the best! I got up this morning and was full of cooking inspiration. Since I had nothing else to do, I was able to follow the inspirations where they led me. First, I made waffles topped with bacon and apples and a Gouda beer sauce (amazing creation, if I do say so myself!), and about an hour later I decided to try making brownies from scratch (I found a recipe online and decided to add a few tweaks of my own - chipotle powder, cinnamon, nutmeg, and bacon grease).

My first thought was that brownies could not be that hard to make. I can make a cake from scratch, how can brownies be that different? That was until I got to the "brownies tend to get tough...don't go wild on the mixing" instructions. How much mixing is too much? With the baking powder biscuits I was told that you could end up with chewy and dense biscuits if you over-mixed, but no one has ever told me that about brownies. So, I mixed a little, and then a little more, but I just couldn't get rid of the big clumps of dough and "dust." I was worried about how dry it was.


It bothering me that there was nothing wet (e.g. milk, oil, etc.) in these brownies. The box mixes always call for something like that don't they? My dough seemed awfully dry to make anything worth eating. I've added these extra dry ingredients to box mixes without adjusting anything, so I figured it wouldn't make a difference here. However, when I changed the ingredients in the cheddar biscuits (see previous entry), I had to add milk to make the very dry and crumbly dough stick together. I looked up a few more recipes and found none that called for anything but the butter, eggs and dry ingredients I was using.

Putting the dough (I keep saying dough because that it what it was like to me, not batter-like at all) into the baking pan was difficult because it was so dry and clumpy. How are you supposed to pour big, dry, clumps into a pan and bake it? I attempted to spread it out, but didn't want to push it around too much for fear of "mixing it too much". There were parts where you could still see the pan and I was worried it would not melt/spread out when baking. At that point I was worried I had my first failure looming.


After about 20 minutes my husband said he smelled brownies, and they smelled good, which seemed to be a good sign. We looked in and they had risen and evened out just a bit. After the suggested cooling time we each tried one. I was afraid, but it smelled wonderful, and then, lo and behold, it tasted wonderful. My brownies were good and not tough or dry at all; my fears had been assuaged! My husband says the spices overpower the chocolate a bit, which he minds, but I don't! These brownies are not really cake-like, but they are not as heavy as fudge-like brownies, they seem to be a good mix. The bacon grease I greased the pan with adds a nice little flavor to the brownies and they are a bit spicy. It might sound like there is a lot going on there between the spices and bacon, but I think it all mixes well. Besides, mixing chocolate and bacon or chocolate and spiciness together is all the rage these days, so it seems natural that they would all go together.


As you know, I am not a big fan of chocolate, so the other flavors are one way to get me to eat brownies. If you are looking for an alternative to the plain chocolate brownie, you might want to try this. And, I guess I proved that it is good to see things through to the end (at least in baking) as they don't always turn out as bad you might think.

The original recipe can be found here. Below is the recipe with my additions. Enjoy!

Scratch Brownies

1 cup melted butter
2 cups white sugar
1 tsp vanilla flavoring
2 eggs
½ cup cocoa
2 cups plain flour
1/2 tsp nutmeg
1tbsp cinnamon
1 tsp chipotle powder
couple tbsp bacon grease


Directions:

Preheat oven to 350 degrees.
Cream margarine and sugar with a mixer.
After the creaming stage, switch to a spoon for mixing. Brownies tend to get tough if worked too much.
Add the vanilla and eggs and mix just until smooth.
Pour in cocoa, flour, nutmeg, cinnamon and chipotle powder. Again, mix until smooth and lumps are broken up. Don't go to wild on the mixing.
Grease 9x13 pan with bacon grease.
Spread dough out into pan and bake on 350 degrees for 25-30 minutes.
Cool brownies for 10 minutes before slicing.


Just for fun, here's a picture of our breakfast. This was a total experiment, and I strongly encourage experimentation in cooking. I started this baking adventure and blog as a way to drag myself off the couch and out of misery and have found that I am not only getting off that couch, I am learning and loving it. The more I learn, the more I want to experiment. I am not saying things will always work out, but why not have fun trying?


Tuesday, January 26, 2010

Chocolate Covered Potato Chips

Let me apologize for not posting last week. I was on vacation in Portland OR, and regretfully did not take the time to post this. I would like to thank everyone for their encouragement and support. My friend told me last night that she has been checking this blog every day anxiously awaiting a new post. Without further ado, here goes...

Chocolate has never been one of my favorites, and many people have been surprised by this. Perhaps it is the fact that I grew up on cheap waxy chocolates. Perhaps it is the fact that my Grams occasionally spoiled me by sharing one of her dark chocolates filled with cream or nuts and left me never wanting anything but those. Either way, much to my husband's dismay, chocolate has never been something I have eaten or cooked with very often.

About 2 months ago we were going to have people over and bought the makings for a good group dessert, chocolate fondue. However, we never got around to it. Needless to say, the chocolate has been getting dusty on my baking shelf since. But then, last weekend, my parents called asking if we wanted to come over and watch the Seven Year Itch. You know, that's the movie where Marilyn Monroe has an almost affair with her downstairs neighbor and, in the 2nd most famous scene of the movie, shares champagne and potato chips with him. My parents said, that because of that scene, we were going to have champagne and potato chips during the movie. When I mentioned to my boss what I would be doing over the weekend, he asked me if I had ever tried chocolate covered potato chips and that got me thinking. I bought a bag of kettle chips, dusted off the chocolate and talked my husband into helping me.

First, we chopped the chocolate (baking chocolate - about 1 lb.) into little slivers:


Then, we melted the chocolate in a make-shift double boiler; we had a metal bowl that sat in one of our pots fairly well. We filled the lower pot with about an inch of water and put it on a simmer. Once the chocolate melted all the way through, it wais time to dip the chips in it. Note: Be sure that the bowl sits snugly in the pot, so no steam escapes. My husband has had chocolate seize up on him (get hard and not melt down again) from water getting into it. Also, be sure to stir constantly so the chocolate heats evenly.

After the chocolate is melted, dip the chips, one at a time, holding the end of each with either your fingers or tongs, into the chocolate. Let the excess drip off for a few seconds (or scrape off excess with spatula if necessary - it was for us) and then place each chip onto wax paper which has been set onto a baking sheet. When you have filled the wax paper, place the baking sheet into the fridge for 10-15 minutes so the chocolate can set. Note: I failed to put the wax paper onto the baking sheet first and had a heck of a time getting it onto one after. And, I discovered it needed to go into the fridge to set because, as I was packing them up to go, they stuck to each other and were still slightly gooey.

I used dark chocolate for this recipe, since I still don't like milk chocolate, and think it turned out great. I used one regular sized bag of Roundy's Kettle Chips and found they held up well and allowed for more potato chip taste than I would have thought. We had a little chocolate left over so we got to make "haystacks" out of the crumbs and managed to also cover some pretzels we had in the cupboard. Although the dipping of each thing is a bit time consuming and tedious, these really are easy to make; find someone to help you like I did and it will go a lot quicker.

My parents seemed to enjoy their plain potato chips a bit more for the movie occasion, but these did go over well wtih them and others I shared with. We just finished our stash of chocolate covered goodies we made here, and I think we will be making them again, maybe instead of the attempted fondue next time!