Monday, March 21, 2011

Guinness Chocolate Cupcakes

Nick recently made a sarcastic comment that he "used to know someone who made cupcakes" when he spotted me looking at cupcake wrappers at a store recently. I got a little miffed at first, but then realized I had been lacking on the cupcake making of late.

I quickly remedied that when, after looking through my recipes, I noticed one labeled "Beer Cupcakes". They sounded good, but when I noticed chocolate was involved, I almost changed my mind. I decided, though, that the beer and the cream cheese frosting might make them good enough for even me to like. I was right.
I used an entire bottle of Guinness for one batch of cupcakes, lots of flour, brown sugar, sour cream, vanilla, baking soda, butter and cocoa powder.

First, the Guinness and butter are combined and heated in a saucepan.

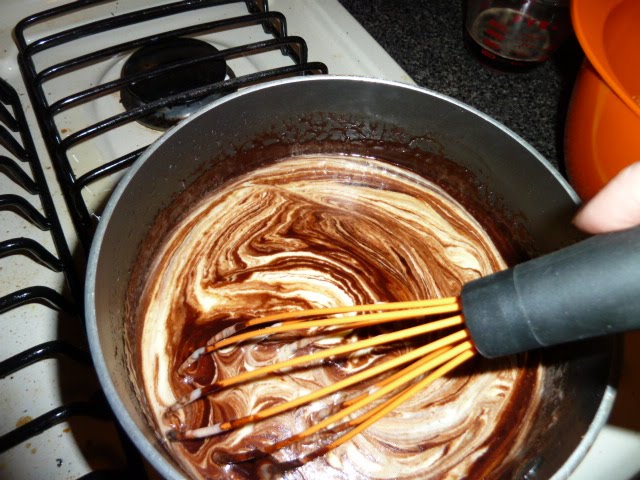
Next, the brown sugar and the cocoa get whisked in, and this is where I fell in love. The smell that was coming from the pan was so intoxicating, I wanted to eat it with a spoon right then and there.


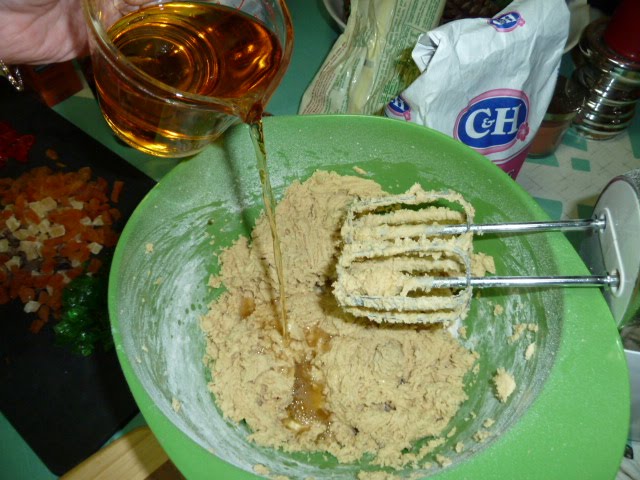
But, I didn't. Instead, I continued with the recipe and mixed the sour cream with the eggs and vanilla and added it to the beer mixture. Looks pretty good, doesn't it? Glad I finally got a coated whisk!

The flour and baking soda are then sifted together and folded into the beer mixture (batter). Folding is always hard for me, because I never seem to get the two mixtures to incorporate in an amount of time that seems appropriate for not over folding.

Then, bake. As you can see, I had too many cupcakes for one pan, and not enough for two. I have been told that you should space them out in this situation, so they cook more evenly, so that's what I did.
I am really liking cream cheese frosting lately. It is not as overpowering or as greasy seeming as buttercream, and cream cheese frosting seems to compliment, or bring out the flavors, of the cake more. Cream cheese, sugar and milk made a great frosting to top these cupcakes.

These cupcakes had a good beer flavor, they were not too sweet, they were moist, and they went very quickly at our house. I will definitely make these again. And, I guess I have to stop saying how much I don't like chocolate since I've found so many tasty recipes to bake that use chocolate. That's a crazy thought!

Monday, January 31, 2011

Lonely Chicago Pie

I have a Sunday morning ritual of getting up early and watching a movie, while the house is still quiet. I always like watching movies, and especially enjoy this tradition as it is a nice bit of relaxation and me time. When I was younger and had cable, it was old movies on the movie channel; in recent years it was Elvis movies (I have many on DVD); and lately, since I've worked through my Elvis collection and have no cable, it’s been whatever movie I think will start my day off right. Yesterday, it was the Waitress.

I love the Waitress not only for the story and the actors, but for the amazing looking pies! I, sit almost slack-jawed, in amazement of how easy they seem to be to make, and at how beautiful the scenes are in which Kerri Russell’s character (Jenna) is making them. I wonder if that was part of the point? The movie doesn't really provide you with instructions on how to bake said pies though, so I've never been sure about attempting to make one of them. Yesterday was a different story...

The Bad Baby Pie (first called the "I Don't Want Earl's Baby Pie") sounded good, but we are not big on quiches in our house, and the Marshmallow Mermaid Pie sounded intriguing. But, in the scene where Jenna teaches Dr. Pomatter how to make one of her mother's pies - the Lonely Chicago - I found my pie. Now, you know I don't normally like chocolate, but chocolate ganache (especially made with dark chocolate) is a bit of a different story, and if you put berries on it you practically have me sold. So, I decided to attempt it.

I talked Nick, who was having a bit of a bad week, into helping me. We can all benefit from baking therapy! He chopped up the chocolate.

Then, I stirred it while it melted in a double boiler.

Then, he stirred while I measured and added cream.

I got the crust ready and he poured in the chocolate,

which he then spread out evenly.

Next, we washed the berries, added some brandy to them and mashed slightly,

and spooned them over the chocolate.

After that, we put it into the oven for 30 minutes, chilled it on the counter for 1 hour and in the fridge for 30 minutes. Finally, we cut some and ate it!

That is not the most picture pretty piece of pie, but it sure tasted awesome! The pie set nicely, the chocolate was like dark chocolate pudding, the berries were nice and firm, some tart and some sweet. The crust was my only complaint. After my morning movie time, we did a lot of housework, projects and grocery shopping. By the time we got around to making the pie, we were both a little tired and decided to use a store bough pie crust. It was a little thinner and not as flaky and tasty as we wanted. Next time, I think we will make the pie before the housework, so we have time to make the crust too.

Like I said, the movie only outlined the basic idea of the pie, so I had to use some of the skills I've learned over the past year and wing it. That was an interesting thought - me making up a recipe. A year ago, I wouldn't have thought this could happen, but it turned out wonderfully!


Here's the info:

Ingredients
about 12 ounces of dark chocolate
about 1 1/4 cups heavy whipping cream
3 small containers of berries, or about 3 cups total (I used 2 of blackberries and 1 of raspberries)
1 tablespoon brandy
1 pie crust

Instructions
Make pie crust and place in a 9 inch pie pan and set aside
Pre heat over to 350 degrees
Shave the chocolate into little pieces and melt it over medium heat in a double boiler
once the chocolate is melted, slowly stir in the cream (don't do this too fast otherwise it might seize up on you and not mix well)
Once the chocolate and cream are well incorporated, pour into pie crust and even out with spatula and set aside
Wash the berries, dry them on a paper towel and put them into a bowl
Measure the brandy and pour over the berries
mash the berries slightly with a spoon or potato masher (don't mash too much otherwise they will be wet mush)
Spoon the berries carefully over the chocolate in the pie crust (don't plop them into the chocolate too hard, otherwise they will sink)
Bake the pie for about 30 minutes, or until soft-set (this means that when you shake the pan softly, it wiggles only a little and seems semi-set, or hardened a bit)
Cool the pie on the counter for at least one hour, then place in fridge for at least 30 minutes to finish setting


Note - the pie will be a fudgy consistency the longer you let it set in the fridge, and if you eat it right out of the fridge in the days after making it. If you want it to be a more pudding consistency, bring it to room temperature before serving.

Thursday, January 27, 2011

Quinoa Ginger Pecan Muffins

I've been on a little bit of health kick lately. Not only because I wanted to get a bit healthier (and more in shape), but because my doctor told me I needed to. It's kind of scary when someone else, especially your doctor, tells you that you need to get healthier; it hits home a bit more. So, I have been trying to follow the Mediterranean diet, exercise some, and bake things that could be considered not all bad for you. That's where this recipe comes in. It is full of healthy and filling quinoa, some dried fruit and nuts, and it goes nicely with an egg, for breakfast.

First, gather the ingredients, cook the quinoa, cut up the apricots, roast the nuts, etc. Oops - forgot the ginger in the picture. Do not forget this in the recipe as it adds a lot of flavor! You can see there is a box of Bisquick there, which isn't normally the most healthy seeming thing, but you don't use very much and it does add a good texture to the muffin.


Then, mix everything together

and put it into muffin tins and bake

Super easy, supper yummy, and good for you, too!

How can you go wrong?

Thursday, January 13, 2011

Picture Day: Cherry Bread

A few weeks ago (I don't remember when exactly), Nick and I were going through our freezer and came across a bunch of cherries we had gotten in Door County in July. Nick said "Cherries, hmm. Maybe you should make something with these." So, I pulled out my Betty Crocker Christmas Cookbook and took a look. It has so much more than strictly Christmas recipes in it! Lo and behold, there was a recipe for pumpkin bread, with a cranberry variation. Cranberries, cherries, they should be interchangeable, right? I decided to give it a try.

First, I gathered the ingredients. I have started doing this lately so I can (1) show my readers what I all used; and (2) remember everything, because I have been known to forget something or race around trying to find something when I need it.

Door County cherries are so good! Yes, we pick them ourselves - that is part of the fun of Door County cherries. And, thanks to my mom-in-law, I have a handy cherry pitter to help pit all of them.


I decided to make one big loaf to eat right away, and couple of small loaves to freeze. That way, I didn't have to eat all the bread at once, and I have something ready (after thawed) if I want it in the future. This was my step-mom's idea, and it works lovely for all kinds of baked goods!

I enjoyed mine with a couple of slices of cave aged white cheddar from Hooks, a very good cheese! Cheese goes with anything doesn't it? :)

Looks like nothing went wrong, doesn't it? Not so fast...The cherries were really wet to work with, probably because they were frozen prior to use, so I had to cook the bread longer than suggested (a few minutes on the small loaves and about 30 on the large loaf - yikes!). Next time I might thaw them farther ahead of time and dry them on paper towels. Also, a couple of pits managed to make it through. Luckily, I was the one who got that piece! Even with those mishaps, I would say this baking adventure turned out pretty well. Not one I will be sharing with anyone, but that is OK.

Sunday, January 9, 2011

Elvis Cupcakes

Elvis is amazing. Some people might not agree, but I think he really is a king. So, in honor of the King's birthday (yesterday), I had to post something. However, I am posting about cupcakes I made last year in honor of the day, since I never got around to posting about them then, and they turned out to be something I just can't think of trying to top for such an occasion.

I got the recipe for banana cupcakes with peanut butter frosting and candied bacon here. Though, as usual, I made a few modifications. And, please note that though Elvis' famed favorite - the PB and B (peanut butter and banana sandwich) - did not contain bacon, I think it makes a great addition to this sweet treat.

First, I fried some bacon. Oh, beautiful bacon!

Then, I chopped the bacon, put it back in the pan, drizzled some honey and a little brown sugar over it, and cooked it until it became harder, sticky and "candied."

Next, I decided to take a few extra strips of bacon that I had fried and puree them in the food processor to add a little extra goodness to the cupcake base. There are many food/drink things that I love - whiskey, cupcakes, bacon, etc. - as I am sure you have noticed, since I tend to write more about them. So, when the opportunity to combine two of those things arises, I take it! And, let me tell you, bacon in cupcakes is grrreat! ;)


Then, I added the bananas to the bacon and pureed some more.


Next, I combined the bacon banana mush with the other ingredients of the recipe.


Finally, I mixed up the peanut butter frosting (however, I did not use the eggs, but added a little milk instead), frosted the cupcakes, added a few pieces of candied bacon, and viola! Cupcake heaven! We ate the heck out of these, and I am sure the King would've too, given his penchant for peanut butter banana sandwiches, and bacon!


Thursday, December 16, 2010

Christmas Spritz Cookies

There are not many cookies I would choose over spritz cookies. So, since I was making Christmas cookies this year, I had to make a batch. I pulled out my Betty Crocker Christmas Cookbook (the recipe can be found here) and my cookie press and went to work.

I decided to get colorful with my cookies and make yellow stars, green trees and red hearts. To do this, divide the dough into batches and work in the food coloring of your choice. Add coloring a few drops at a time and keep adding and working in until it reaches the color you want. Be warned, though, you will have very colorful hands when you are done!

Once you have the color worked in to each batch, place one into the cookie press with your cut-out of choice attached and press onto cookies sheet. I usually press for about 5 seconds before lifting and going to the next cookie. Once you reach the end of your dough, you will have leftovers that will not make it through the press. This is why you can see a couple of red circle cookies below. I also pressed some red hots into the red cookies and sprinkled some candy dots onto the trees to make them look a bit more festive.

This is such a simple recipe, but it can take a bit of time. It is all worth it though - look at how lovely those look, and they taste great too! These will be a go-to recipe for me, even if it's not Christmas time!

Thursday, December 2, 2010

Christmas Cookies

Making Christmas cookies is usually something I leave to someone else, especially my Grams, as she made them so well. Without her this year, I decided I must finally attempt the tradition, though I couldn't bring myself to attempt hers just yet. I don't have many of her original recipes, and I fear I might ruin the memory of hers trying to find substitutes. So, this year, I turned once again to The Pioneer Woman (Ree) for inspiration, and I got some much appreciated help from my friend Claire. Not only does Claire make a great helper (she helped with my dad's 60th birthday cupcakes), but having two people allows for some good action shots (as you will see below)!

First, we decided to take the Festive Fruitcake Cookies recipe and adapt it. The adaption gave us a bit more of an Irish recipe, which was needed for Nick and I's annual Christmas party (Irish themed this year). Ree's recipe calls for brandy, and we used Powers Irish Whiskey instead. Also, Ree's recipe calls for candied fruits and nuts, and we decided to do without the nuts and go with a mix of candied and dried fruits instead, to be more like a traditional Irish Christmas cookie recipe I had seen.

Look at the beautiful colors: red and green candied cherries, dried apricots, dates and pineapple, all cut into tiny pieces.

After the fruit was chopped and ready, we mixed the ingredients. Then we added the eggs to the already creamed sugar and butter.

Next, we mixed the milk and baking soda mixture, the flour, the whiskey and vanilla. Isn't all that whiskey wonderful looking?!

Finally, we mixed in the fruit. At that point, Ree's recipe says the batter should be rather wet. Ours really wasn't, so we added a bit more whiskey. We opted for whiskey over water or milk, because how can you ever go wrong with more whiskey? By eating too much of the batter, that's how! You might be tempted to do this, but it was not not the best idea I ever had - strong stuff!

These cookies turned out very cake-like. The dried fruit softened nicely. And, though the whiskey taste might be a bit potent for some, the flavors blended very well. Ree's recipe suggests making a glaze to top these cookies with, but we didn't think they needed it.

The second batch of cookies we decided to make was Christmas Cherries. These are a citrusy sugar cookie kind of base with candied cherries on top. However, we again modified the recipe, not having or wanting to use so many candied cherries. We instead decided to do half of the cookies topped with candied cherries and the other half with white chocolate chips, since Claire wanted to incorporate some kind of chocolate.

First, we creamed the butter and sugar. Then, added the eggs, vanilla, lemon peel (we only had lemons, so that is what we used), and lemon juice and beat them together.
Next, we added the sifted flour.

Ree's recipe says to then put the dough into a Ziploc and refrigerate for an hour. However, we didn't have an hour, and didn't want to mess with trying to get our dough in and out of a Ziploc, so rolled into a rough ball shape, wrapped it in wax paper and put it in the freezer for a half hour. This seemed to work out.

Look at those green cherries! They are somehow wondrously delightful and a little disgusting at the same time. :)

Finally, we made little balls out of the dough, used our thumb to imprint a spot to put the cherries and white chocolate chips in to and baked them. The lemon butter cookie was delicious, and the candied cherry was a surprisingly good addition.

The white chocolate chips did not stick to the dough, however, so we had a slight panic moment. Claire suggested melting caramels and dropping it onto the top of the chips to make them stick. I vaguely knew how to make homemade caramel (didn't have any store bought ones), so we tried it. I love it when recipes turn into experiments!

We combined milk, sugar, maple syrup and butter, stirring and heating until thickened to the consistency we wanted and then drizzled it over the cookies with a spoon.

The final product of our little experiment was great; the caramel stuck, and the taste combination was better than I thought it would be.

My one complaint about these cookies (candied cherry and white chocolate chip caramel) is that the cookie itself is extremely crumbly. You have to pop the whole thing in your mouth at once, or make a big mess on the floor that you will have to be sure to vacuum up before it gets smashed into the grooves of your rug (Ugh! What a mess!). Unfortunately, I don't know how to fix that one :(

Maybe next year I will tackle some of my Gram's old recipes, but until then, these are awesome!